Let’s make a Halloween Butler with Raspberry Pico and CircuitPython. In CircuitPython, there is the MP3 library for playing audio clips, directly from the Pico’s flash memory. So it will be easy to add a speaker and play some Halloween tunes, while also controlling LED-lights and servo motors.

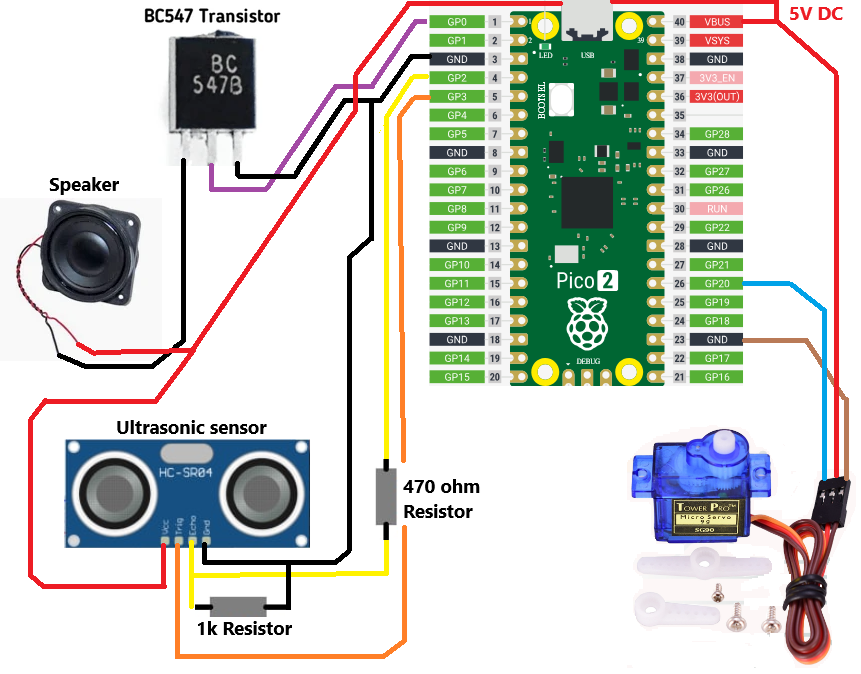
To connect the devices into the Raspberry Pico we need to draw a circuit drawing and select the used pins. Then we can try to use those in pins the code. But sometimes when working with the code, we need to try with code and change later some pins, because of the how the Pico device operates with PWM signals. If changing the pin in the later code, we also need to remember to change the circuit drawings.
To start coding first we need to install the Thonny code editor
(Previous blog post here: https://koodinkutoja.com/raspberry-pico-testing-with-ultrasonic-sensor-and-led-light-strip-thonny-code-editor/)
Then we need to install the CircuitPython to the Raspberry Pico device
https://learn.adafruit.com/welcome-to-circuitpython/what-is-circuitpython
We need to press the button on Pico, while connecting the USB-cable. After that we can copy the .uf2 file to the Pico device:

After copy finishes, Pico will reboot automatically and new window opens:

Now we have the CircuitPython installed to the Pico device and we can start programming.
Let’s configure the Thonny code editor to use CircuitPython and select the correct COMX-port:

Now we can add the MP3 library and start writing the Halloween theme functionality to the code.
(Previous instructions how to add the library: https://koodinkutoja.com/tehdaan-hirvittava-soittorasia/ )


Let’s save the new code to the Raspberry Pico flash memory (CircuitPython device).

We can write the file code.py over. By default there is just a “Hello World” line.
When we write the main .py file as code.py, it should automatically start, when powering up the Raspberry Pico device.
Then we of course need to copy and save the .mp3 file to the Pico flash memory:

Now we can try to press the “Play button” at the Thonny code editor to start the python program.
We should start to hear the .mp3 file play out at the speaker and after the play finishes “Thonny Shell terminal” should also have a new message, “Playing Audio”.

Modify the MP3 file with Audacity to adjust volume up

( More information here: https://koodinkutoja.com/playing-audio-clips-with-arduino/ )
Let’s add LED stripe control to the code
We can also add the NeoPixel LED-strip control to our code.
https://learn.adafruit.com/circuitpython-essentials/circuitpython-neopixel
Copy the adafruit neopixel lib to the Pico /lib/ folder:

Then let’s modify the code.py
import board
import audiomp3
import audiopwmio
import pwmio
import pulseio
import time

from rainbowio import colorwheel
import neopixel

#Setting up the MP3 file for playing
audio = audiopwmio.PWMAudioOut(board.GP0)
decoder = audiomp3.MP3Decoder(open("halloween.mp3", "rb"))

#Setting up the Neopixel LED stripe, to port A1
pixel_pin = board.A1
num_pixels = 30

pixels = neopixel.NeoPixel(pixel_pin, num_pixels, brightness=0.3, auto_write=False)

def color_chase(color, wait):
    for i in range(num_pixels):
        pixels[i] = color
        time.sleep(wait)
        pixels.show()
    time.sleep(0.5)

def rainbow_cycle(wait):
    for j in range(255):
        for i in range(num_pixels):
            rc_index = (i * 256 // num_pixels) + j
            pixels[i] = colorwheel(rc_index & 255)
        pixels.show()
        time.sleep(wait)

RED = (255, 0, 0)
YELLOW = (255, 150, 0)
GREEN = (0, 255, 0)
CYAN = (0, 255, 255)
BLUE = (0, 0, 255)
PURPLE = (180, 0, 255)

while True:
    audio.play(decoder)      # Playing MP3 on constant loop

    pixels.fill(RED)
    pixels.show()
    # Increase or decrease to change the speed of the solid color change.
    time.sleep(1)
    pixels.fill(GREEN)
    pixels.show()
    time.sleep(1)
    pixels.fill(BLUE)
    pixels.show()
    time.sleep(1)

    color_chase(RED, 0.1)  # Increase the number to slow down the color chase
    color_chase(YELLOW, 0.1)
    color_chase(GREEN, 0.1)
    color_chase(CYAN, 0.1)
    color_chase(BLUE, 0.1)
    color_chase(PURPLE, 0.1)

    rainbow_cycle(0)  # Increase the number to slow down the rainbow
Adding the servo to move the Skull position
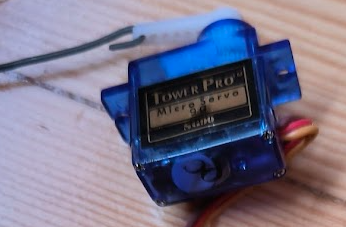
Pico can also control servo motor positions, with control pulses. More information can be found from the Adfruit website; https://learn.adafruit.com/circuitpython-essentials/circuitpython-servo https://www.adafruit.com/product/169
Also if searching from Youtube, video tutorials are available;
To be able to use the Adafruit Circuit python libraries
We need to download the .zip file and then extract and copy the library to the /lib folder of the Pico device.
https://github.com/adafruit/Adafruit_CircuitPython_Bundle
Check if you are using version 8 or 9 of the CircuitPython on your Raspberry Pico device.
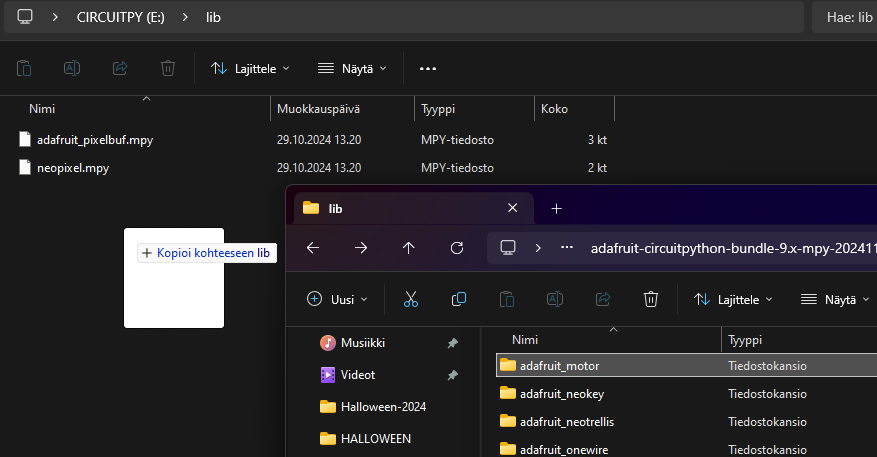
Copy the needed libraries into the Raspberry Pico device flash memory /lib folder.
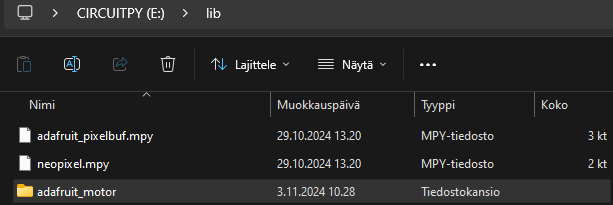
Then add the servo control to the code..
import board
import audiomp3
import audiopwmio
import pwmio
import pulseio
import time
from rainbowio import colorwheel
import neopixel

from adafruit_motor import servo
# Create PWMOut object
pwm = pwmio.PWMOut(board.GP20, frequency=50)
# Create a servo object with the pwm  object created above
servo_1 = servo.Servo(pwm)

#Setting up the MP3 file for playing
audio = audiopwmio.PWMAudioOut(board.GP0)
decoder = audiomp3.MP3Decoder(open("halloween.mp3", "rb"))

#Setting up the Neopixel LED stripe, to port A1
pixel_pin = board.A1
num_pixels = 30

pixels = neopixel.NeoPixel(pixel_pin, num_pixels, brightness=0.3, auto_write=False)

def color_chase(color, wait):
    for i in range(num_pixels):
        pixels[i] = color
        time.sleep(wait)
        pixels.show()
        time.sleep(0.5)

def rainbow_cycle(wait):
    for j in range(255):
        for i in range(num_pixels):
            rc_index = (i * 256 // num_pixels) + j
            pixels[i] = colorwheel(rc_index & 255)
        pixels.show()
        time.sleep(wait)

RED = (255, 0, 0)
YELLOW = (255, 150, 0)
GREEN = (0, 255, 0)
CYAN = (0, 255, 255)
BLUE = (0, 0, 255)
PURPLE = (180, 0, 255)

while True:
    servo_1.angle = 0     # Move servo motor to position 0,  turn the skull
    audio.play(decoder)   # Playing MP3 on constant loop


    pixels.fill(RED)
    pixels.show()
    # Increase or decrease to change the speed of the solid color change.
    time.sleep(1)
    servo_1.angle = 00   # Move servo motor to position 90,  turn the skull
    pixels.fill(GREEN)
    pixels.show()
    time.sleep(1)
    pixels.fill(BLUE)
    pixels.show()
    time.sleep(1)

    color_chase(RED, 0.1)  # Increase the number to slow down the color chase
    color_chase(YELLOW, 0.1)
    color_chase(GREEN, 0.1)
    color_chase(CYAN, 0.1)
    color_chase(BLUE, 0.1)
    color_chase(PURPLE, 0.1)

    servo_1.angle = 180  # Move servo motor to position 180,  turn the skull
    rainbow_cycle(0)     # Increase the number to slow down the rainbow
Now we can also add the Ultra sonic distance sensor for detecting human motion
It would be nice to be able to detect if some person is coming nearby the Butler, and trigger the sound and movement. So let’s try to add a ultrasonic distance sensor to the Butler.
(Previous instructions how to add the Ultra Sonic sensor can be found from here: https://koodinkutoja.com/raspberry-pico-testing-with-ultrasonic-sensor-and-led-light-strip-thonny-code-editor/ )
Then we need to change the code again, to add the person detection. We can use the Adafruit CircuitPython HCSR04 library. https://github.com/adafruit/Adafruit_CircuitPython_HCSR04
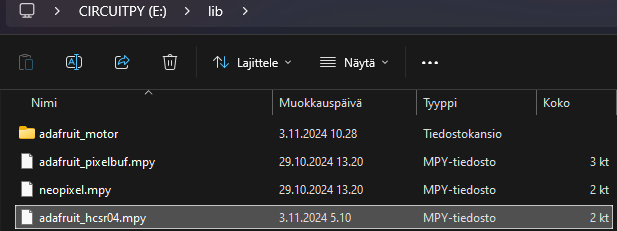
Then modify the code and add measuring the distance. And add some logic if the distance is small, then trigger the MP3 play out to the speaker.
import time
import board
import adafruit_hcsr04

sonar = adafruit_hcsr04.HCSR04(trigger_pin=board.D3, echo_pin=board.D2)

while True:
    try:
        print((sonar.distance,))
    except RuntimeError:
        print("Retrying!")
    time.sleep(2)
And when adding into the project:
import time
import board
import audiomp3
import audiopwmio
import pwmio
import pulseio

#######################################################################
# ULTRA SONIC SENSOR
#######################################################################
#import the Ultra Sonic sensor library from adafruit zip
import adafruit_hcsr04
#sonar = adafruit_hcsr04.HCSR04(trigger_pin=board.GP3, echo_pin=board.GP2)
#sonar = adafruit_hcsr04.HCSR04(trigger_pin=board.D5, echo_pin=board.D6)
sonar = adafruit_hcsr04.HCSR04(trigger_pin=board.GP3, echo_pin=board.GP2)
#sonar = adafruit_hcsr04.HCSR04(trigger_pin=board.D3, echo_pin=board.D2)
#######################################################################

#############################################################################
# NEOPIXEL RGB LED STRIPE
#############################################################################
from rainbowio import colorwheel
import neopixel
#Setting up the Neopixel LED stripe, to port A1
pixel_pin = board.A1
num_pixels = 30
pixels = neopixel.NeoPixel(pixel_pin, num_pixels, brightness=0.3, auto_write=False)
#############################################################################

##########################################################
# SERVO MOTOR CONTROL
##########################################################
from adafruit_motor import servo
# Create PWMOut object
pwm = pwmio.PWMOut(board.GP20, frequency=50)
# Create a servo object with the pwm  object created above
servo_1 = servo.Servo(pwm)
##########################################################

##########################################################
# MP3 PLAYER
##########################################################
#Setting up the MP3 file for playing
audio = audiopwmio.PWMAudioOut(board.GP0)
decoder = audiomp3.MP3Decoder(open("halloween.mp3", "rb"))
##########################################################


# LED STRIPE CONTROL
def color_chase(color, wait):
    for i in range(num_pixels):
        pixels[i] = color
        time.sleep(wait)
        pixels.show()
        time.sleep(0.5)

def rainbow_cycle(wait):
    for j in range(255):
        for i in range(num_pixels):
            rc_index = (i * 256 // num_pixels) + j
            pixels[i] = colorwheel(rc_index & 255)
        pixels.show()
        time.sleep(wait)

RED = (255, 0, 0)
YELLOW = (255, 150, 0)
GREEN = (0, 255, 0)
CYAN = (0, 255, 255)
BLUE = (0, 0, 255)
PURPLE = (180, 0, 255)


while True:
    servo_1.angle = 0        # Move servo motor to position 0,  turn the skull
    audio.play(decoder)      # Playing MP3 on constant loop

    if sonar.distance > 0 and sonar.distance < 100:
        human_detected=true
        print ("Human detected!")

    elif sonar.distance > 100 and sonar.distance < 1500:
        human_detected=false
        print ("Human not detected")


    if human_detected == true:
        servo_1.angle = 90
        audio.play(decoder)        # Playing MP3 on constant loop
        pixels.fill(RED)
        pixels.show()
        # Inc. or decrease to change the speed of the solid color change.
        time.sleep(1)

    elif human_detected == false:
        servo_1.angle = 0
        pixels.fill(GREEN)
        pixels.show()
        time.sleep(1)
        pixels.fill(BLUE)
        pixels.show()
        time.sleep(1)
        servo_1.angle = 180
        color_chase(RED, 0.1)  # Inc. the number to slow down the color chase
        color_chase(YELLOW, 0.1)
        color_chase(GREEN, 0.1)
        color_chase(CYAN, 0.1)
        color_chase(BLUE, 0.1)
        color_chase(PURPLE, 0.1)
        rainbow_cycle(0)  # Inc. the number to slow down the rainbow